Tuesday, December 17, 2013

PostgreSQL Upgrade - Fedora 20

Fedora 20 will upgrade your PostgreSQL database from 9.2.6-1 to 9.3.1-2.

Since this is a major upgrade it will require that you upgrade your database.

Here is how to do it:

  1. Install the upgrade utilities:  yum install postgresql-upgrade
  2. Become user postgres:  sudo su - postgres
  3. Rename the data directory:  mv /var/lib/pgsql/data/ /var/lib/pgsql/data_9.2/
  4. As root, initialize your 9.3 database:  sudo postgresql-setup initdb
  5. As user postgres, Copy your pg_hba.conf:  cp /var/lib/pgsql/data_9.2/pg_hba.conf/ /var/lib/pgsql/data/pg_hba.conf/
  6. To avoid any potential password issues, temporarily change "md5" to "trust" in both pg_hba.conf files
  7. Run the upgrade process:  pg_upgrade -b /usr/lib64/pgsql/postgresql-9.2/bin/ -B /usr/bin/ -d data_9.2/ -D data
  8. Change "trust" to md5" if you changed in step 6
  9. Enable your postgresql.service:  sudo systemctl enable postgresql.service
  10. Start your postgresql.service:  sudo systemctl start postgresql.service
  11. Run the analyse_new_cluster.sh script as suggested
  12. Run the delete_old_cluster.sh script as suggested

Thursday, July 11, 2013

Fedora 19 Installation on the ASUS X401U

If you want a great budget laptop that runs Fedora with no issues, look no further: 
ASUS X401U - Best Buy

It's not a speed demon, but:
  • Great form factor, thin and light
  • AMD processor - more bang for the buck
  • ASUS build quality
  • Open Source compatibility
  • Bright sharp display, supports desktop effects
  • Perfectly fine for web surfing, word processing, watching videos, music, light gaming, etc.

What's the negative?  It comes bundled with Windows.  Well, it's easy to fix that by installing Fedora 19.

First you'll need to download the Fedora Network Install Image

Then put that image on a USB stick.  You only need 512Mb.
Making USB Media

Insert the USB stick in the laptop.

Disable the UEFI secure boot - you don't need it.  If you want to read more about it:  UEFI Secure Boot Guide

When powering on your system for the first time, you will be presented with the boot menu.

Please select boot device:
Windows 8
Enter Setup
 Select:  Enter Setup - to enter the BIOS settings

Go to the Security tab, scroll down until you ave selected:
System Boot Control                    [Enabled]
When you have selected, you will notice the text is now white, and on the right side of the screen you will see the text:

Secure Boot flow control.
Secure Boot is possible only if System runs in User mode

Press enter, a blue menu will pop up, with the word Enabled in a black background.  Use the down arrow to select:  Disabled

Press enter, then press F10 to save and exit.

When the system boots again, select the inserted USB stick to boot the Fedora Network install.

Follow the prompts.  When you reach the part about the installation media, select the entire drive and tell Fedora to reclaim the space.  The other installation defaults are fine.  Be advised if you reclaim the entire disk (which is what I did) there is no going back.  ASUS ships the disk with a recovery partition, and if you reclaim the entire disk, you've erased that partition.

You may wish to plug in a network cable rather than using wireless for the install, that would be faster.  The network connector on the laptop has a latch that you may need to manually pull down a bit if you have problems removing the Ethernet cable.  You'll notice it moves downward when you first insert the cable, then snaps back up somewhat to lock the cable in place. 

Friday, June 14, 2013

TTRSS - Synchronization for changes to config.php-dist

This procedure requires you first setup the TTRSS UTILS environment described in the post:  TTRSS  UTILS - Fedora Tiny Tiny RSS Utilities

If you are running the Update Script for the TTRSS Trunk version described in another post, you can ignore this.  The synchronization functionality is already built into that utility.


This posting is for those who don't wish to run the trunk version.  It doesn't stop or start any services.  It basically automatics the synchronization process, merging changes from the new config.php-dist and your existing config.php.  The change logic is as follows:
  1. config.php-dist is considered authoritative, which means all of those changes will be merged into your new config.php
  2. If the particular statement in config.php-dist has not been modified from the previous version, and it matches your config.php that line will be displayed in GREEN.  No action is required for that line.
  3. Changes made to your config.php will be preserved only if they are made to a define statement AND that define statement has not been changed in config.php-dist from the time it was originally cloned into your config.php.  If your config.php statement has been carried over to the new config.php that line will be displayed in YELLOW.  No further action is required for that line.
  4. If a define statement has been changed, it will replace whatever you had in your config.php - the assumption being that this is something which requires manual intervention.  This line will be displayed in RED.  You should use a program such as vim to examine both files and make the necessary changes, i.e. vim -d config.php config.php-dist
  5. If the define is completely new, it will included in your new config.php file and the line will be displayed in BLUE.  You should look at the comments for that define in the new config.php and determine if any changes are required.
  6. Your current config.php will be renamed and retained for 14 days
  7. A log will be created which shows actions that have occurred.  These actions are also displayed on your screen as the script is executing.
FIRST TIME USAGE:
Run this utility BEFORE and AFTER the upgrade.  This will allow the utility to create a "before-upgrade" image of "config.php-dist" to use for comparison purposes.  If you have already upgraded, you won't be able to take advantage of this check for the first run - however, subsequent runs will be able to make this extra comparison.  DO NOT delete or change the "config.php-dist_cfg_ttrss" file this utility creates.

To run:
  1. cd $home
  2. cd ttrss_maint/ttrss_utils
  3. sudo ./cfg_ttrss

TTRSS UTILS - Fedora Tiny Tiny RSS Utilities

I've decided to standardize my group of utilities for TTRSS.  My original intent on posting all these updates in the blog was to help folks get config samples, utilities and installation/configuration information in an easy and straightforward manner.

The blog entries will continue, but I'm changing the way code samples and utilities are organized and distributed.

All files will now be hosted on bitbucket:

https://gbcox@bitbucket.org/gbcox/ttrss_utils.git

You would install them in your home directory by:
  1. cd $home
  2. mkdir ttrss_maint
  3. cd ttrss_maint
  4. git clone https://gbcox@bitbucket.org/gbcox/ttrss_utils.git
Now, if you wish to get the latest copy of the utilities, it is simple as:
  1. cd $home/ttrss_maint/ttrss_utils
  2. git pull
Before you start using any of the utilities, you must configure a set of variables which are unique to your system.
  1. cd $home
  2. cd ttrss_maint
  3. cp  ttrss_utils/src_var_ttrss_dist src_var_ttrss
  4. vim src_var_ttrss
  5. ===> Edit the file ===<
  6. :wq
The $home/ttrss_maint directory will contain other subdirectories relating to different functions; i.e. the database backup utility files will be stored in $home/ttrss_maint/db_backup.  The src_var_ttrss script is the only non-directory file which will exist in this directory. 

The utilities are designed to be executed from the $home/ttrss_maint/ttrss_utils directory.  They will call src_var_ttrss to obtain their variables.
 

The other blog entries which describe the utilities and sample configurations will be updated to reflect these changes.

Thursday, June 6, 2013

Update Script for TTRSS Trunk Version - Fedora

This procedure requires you first setup the TTRSS UTILS environment described in the post:  TTRSS  UTILS - Fedora Tiny Tiny RSS Utilities

To run:
  1. cd $home
  2. cd ttrss_maint/ttrss_utils
  3. sudo ./git_ttrss
This procedure does the following:
  1. Stops your web server
  2. Stops your TTRSS Update service
  3. Stops the Sphinx Indexing Service - if activated in config.php
  4. Updates TTRSS
  5. Updates the TTRSS CONTRIB Plugins
  6. Starts the web server
  7. Starts your TTRSS Update service
  8. Starts the Sphinx Indexing service - if activated in config.php
  9. Notification of Database Schema change - which will also require you manually start your TTRSS Update and Sphinx Services
  10. Automatic config.php update if config.php_dist changes.  The previous copy of config.php will be retained for 14 days
  11. Creation of activity log file which will be deleted after 14 days
First you'll want to review:
How To Use Trunk Version?

You will need to have cloned TTRSS:
  1. cd $WEB_ROOT
  2. sudo git clone https://github.com/gothfox/Tiny-Tiny-RSS.git $TTRSS_DIR
 You will need to have cloned TTRSS_CONTRIB:
  1. cd $home
  2. cd ttrss_maint
  3. git clone https://github.com/gothfox/Tiny-Tiny-RSS-Contrib.git ttrss_contrib
If a database schema change is detected you will receive a notification message that you will be prompted to make the update when you attempt to login to TTRSS.  After you complete the schema update you will need to:

Rebuild your Sphinx full-text index (if you are using Sphinx):
./bin/indexer --all

Then manually start your update and Sphinx services: 
systemctl start TTRSS_UPDATE_SERVICE.service
systemctl start SPHINX_SERVICE.service (If using Sphinx)

Thursday, May 23, 2013

PostgreSQL Database Backup on Fedora

This procedure requires you first setup the TTRSS UTILS environment described in the post:  TTRSS  UTILS - Fedora Tiny Tiny RSS Utilities

This method uses CRON under your own userid and pulls db_name and db_user information from your TTRSS config.php

Backup files will be stored in $home/ttrss_maint/db_backup/ and will be retained for 14 days.

Create a .pgpass file in your home directory:
*:*:ttrss_db:ttrss_user:ttrss_user_password

Secure the file:  chmod 600 .pgpass

Copy the contents of ../ttrss_utils/sample_conf/db_backup_crontab into your crontab:  crontab -e
Replace xxxxx with your account_name.

If you wish to run the backup manually:
  1. cd $home 
  2. cd ttrss_maint/ttrss_utils 
  3. ./pgsql_cron_backup

Installing PostgreSQL on Fedora for Tiny Tiny RSS

I recently decided to switch my Tiny Tiny RSS database from MariaDB/MySQL to PostgreSQL.  Mainly  because of this post:  MySQL issues: Lock wait timeout exceeded

The bottom line is you get much better performance from Postgresql.  Postgresql uses less system resources and it really isn't a big deal to install or support; it is fairly simple.  I really don't get why it isn't more popular.  If it were a massive pain, I could understand it, but it really isn't.  Go figure!

That said, here we go...
  
As root:
yum install postgresql postgresql-server postgresql-contrib php-pgsql

After the install, you must next initialize the postgresql database:
postgresql-setup initdb

Now start and enable the service, so it will automatically start when you boot: 
systemctl start postgresql.service
systemctl enable postgresql.service

Configure the service account for Tiny Tiny RSS: 
su - postgres
createuser -P -S -D -R -l ttrss_user

When prompted to enter a password, create a new password:
enter new password:  your_password

Create the Tiny Tiny RSS Database:
createdb --owner=ttrss_user ttrss_db

Grant permissions to the ttrss_db: 
psql
grant all on database ttrss_db to ttrss_user;

Now you need to modify the postgresql client authentication configuration file to ensure you can login with all the changes you just made: 
cd /var/lib/pgsql/data

Make a backup of the distribution configuration file: 
cp pg_hba.conf pg_hba.conf.dist
vim pg_hba.conf

Now, change the lines ending in 'ident' to end with 'md5'
:wq

Restart PostgreSQL to activate all the changes:
systemctl restart postgresql.service

Load the Tiny Tiny RSS Postgresql schema:
psql -U ttrss_user -d ttrss_db -f /var/www/html/ttrss/schema/ttrss_schema_pgsql.sql

Monday, May 13, 2013

Upgrading TTRSS - Sphinx search, schema changes and config.php


After you complete the upgrade, you'll want to check:
  1. config.php-dist to see if there have been any changes.  I have a post which describes a utility that can assist.
  2. Schema changes.  TTRSS will walk you through the procedure, if needed, when you first try to login after an upgrade.
  3. Rebuild the Sphinx full-text index of the ttrss database.  You'll want to do this if there has been a schema change.
To rebuild the Sphinx full-text index:

sudo systemctl stop searchd.service 

Run the indexer to create the full-text index of the ttrss database:

cd /bin
sudo ./indexer --all

sudo systemctl start searchd.service 

That's it.  You're done.


Friday, May 3, 2013

SPDY with NGINX 1.4.0 on Fedora 18 - Tiny Tiny RSS

I've seen many postings regarding the activation of SPDY with Tiny Tiny RSS - quite a few people seem to have installation/configuration problems.

With the recent release of NGINX 1.4.0, SPDY support is included so you don't have to do it manually.  NGINX 1.4.0 will be included with Fedora 19, which will be available in July.

I pulled the spec file from the fedora testing repository and created a build for Fedora 18.  It is available here:  nginx-1.4.0-2.fc18.x86_64.rpm

If you are already running NGINX on Fedora 18 with the current repository rpm all you need do is:  yum upgrade nginx-1.4.0-2.fc18.x86_64.rpm

If not, I highly recommend you first follow these instructions by David Strauss
Tiny Tiny RSS on Fedora 18

A few notes about the install:
  • Remember if you are converting from apache you need to stop and disable the apache service before trying to install nginx
  • I recently installed Fedora on a new computer and did not install Apache, so I made sure that /var/www was set to nginx:nginx.  You also need to edit /etc/php-fpm.d/www.conf and change the user/group parameters in that file from apache to nginx
  • If you don't already have mysql installed, you may wish to install postgresql instead since it has better performance than mysql or mariadb.  I have a post which has more information. 
  • Pay attention to the root settings in ttrss.conf - if you want to specify ttrss in your URL (https://localhost/ttrss), you need to make the root /var/www/html instead of /var/www/html/ttrss - I use /var/www/html in my version of ttrss.conf

After the upgrade to nginx-1.4.0 is complete, change the ttrss.conf file in David's example as follows:

Change:
listen 443; to listen 443 ssl spdy; #Turn SPDY on

Then insert the following line directly after:
spdy_headers_comp 7; #Compress your headers

You can find the explanation of these settings here:
NGINX SPDY Reference Page

Alternatively, you can just download the file here and place it in your
/etc/nginx/conf.d directory:  ttrss.conf

Now you can restart your nginx service:
systemctl restart nginx.service

If you wish you can test by installing an addon which is available for either Firefox or Chrome:

Firefox SPDY Indicator

Chrome SPDY Indicator

Have fun!

Friday, April 26, 2013

MariaDB/MySQL Database Backup on Fedora

This procedure requires you first setup the TTRSS UTILS environment described in the post:  TTRSS  UTILS - Fedora Tiny Tiny RSS Utilities

This method uses CRON under your own userid and pulls db_name and db_user information from your TTRSS config.php

Backup files will be stored in $home/ttrss_maint/db_backup/ and will be retained for 14 days.


Create a .my.cnf file in your home directory:

[mysqldump]
user=root
password=your_mysql_root_password

Secure the file:  chmod 600 .my.cnf

Copy the contents of ../ttrss_utils/sample_conf/mariadb_db_backup_crontab into your crontab:  crontab -e
Replace xxxxx with your account_name.

If you wish to run the backup manually:
  1. cd $home 
  2. cd ttrss_maint/ttrss_utils 
  3. ./mariadb_cron_backup

Wednesday, April 24, 2013

MariaDB is replacing MySQL in Fedora - Tiny Tiny RSS

MariaDB will be replacing MySQL as the default beginning with Fedora 19.  Fedora 19 is scheduled to be released in July, 2013. 

If you are running Tiny Tiny RSS and wish to convert now, I would suggest the following sequence:

As root:
systemctl stop ttrss-update.service
systemctl stop httpd.service
systemctl stop searchd.service
systemctl stop mysqld.service


>>>> Follow these instructions...

>>>> Then issue the upgrade command to clean things up for mariadb:
systemctl start mysqld.service
mysql_upgrade -u root -p

>>> Enter your mysql root password to continue

>>>> When finished restart the mysqld.service
systemctl restart mysqld.service

>>>> Now bring the rest of it back up
systemctl start seachd.service
systemctl start httpd.service
systemctl start ttrss-update.service


You're done.

Update Tiny Tiny RSS as a Fedora Service

If you are using postgresql:
Download rss-update.service

As root:
Place the file in:  /usr/lib/systemd/system/

Issue the following commands:
systemctl enable rss-update.service
systemctl start rss-update.service


If you are using mariadb/mysql:
Download ttrss-update.service

As root:
Place the file in:  /usr/lib/systemd/system/

Issue the following commands:
systemctl enable ttrss-update.service
systemctl start ttrss-update.service

You're done.

How to install Sphinx in Fedora for Tiny Tiny RSS


The generic instructions can be found here:

Tiny Tiny RSS Wiki: SphinxSearch

sudo dnf install sphinx

Download the Fedora specific TTRSS configuration file for the database you are using here:

Fedora Sphinx (Pre-version 2.2.6) Configuration for Tiny Tiny RSS - PostgreSQL

Fedora Sphinx (Pre-version 2.2.6) Configuration for Tiny Tiny RSS - MariaDB

Fedora Sphinx Configuration for Tiny Tiny RSS - PostgreSQL

Fedora Sphinx Configuration for Tiny Tiny RSS - MariaDB

Place the above configuration file in /etc/sphinx as sphinx.conf - make the few necessary configuration changes to reflect how you created the PostgreSQL or MariaDB/MySQL database and you should be good to go.

Run the indexer to create the full-text index of the ttrss database:
sudo /usr/bin./indexer --all

Now enable the Sphinx searchd service:
sudo systemctl enable searchd.service

Now start the Sphinx searchd service:
sudo systemctl start searchd.service

Last but not least, modify your Tiny Tiny RSS configuration to activate Sphinx.  The configuration is located at:  /var/www/html/ttrss_directory/config.php
where ttrss_directory is the name you used, i.e. ttrss, rss, etc.

change:
define('SPHINX_ENABLED', false); to define('SPHINX_ENABLED', true);

Now setup automatic update of the search indexes:
sudo crontab -e
@daily /bin/indexer --rotate ttrss >/dev/null 2>&0 # Same as 0 0 * * *
*/20 * * * * /bin/indexer --rotate delta >/dev/null 2>&0 # Every 20 min


Write the file with :wq and you're done.

Monday, January 21, 2013

Replacing DMD Chip on Samsung HL61A750

I've been a fan of DLP rear projection sets for several years now.  It's a shame they are no long being produced.  You just couldn't beat their combination of picture size, quality and price. 

You can get more background on the technology here:

How DLP Works

Unfortunately, for whatever reason some of the chips had a higher than normal failure rate.  One symptom of a failure is the appearance of white or black dots in the picture.  You can do a simple web search and see an abundance reports regarding this issue.

Fortunately, this issue is relatively simple to correct.  Just replace the DMD chip.  If you can feel comfortable working on a PC you can most definitely do it. 

I got my DMD chip from ShopJimmy.com

First watch this good generic video... it will walk you through the concepts of what you're going to do.

Samsung 4719-001997 DLP Chip Replacement Guide for DLP TV

Now for a few tips specific to the HL61A750.

Remove the rear cover.  There are 10 screws to remove.  Six are shown.  There are an addition two screws on each side.
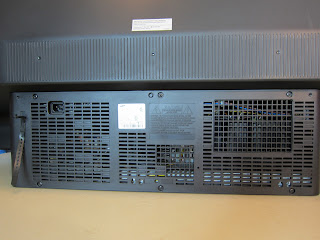
Samsung HL61A750 Rear Cover


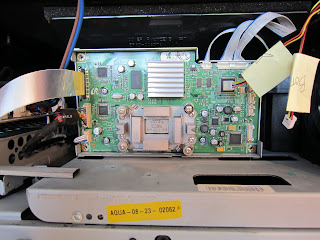
After you remove the rear cover, this is what you'll see:
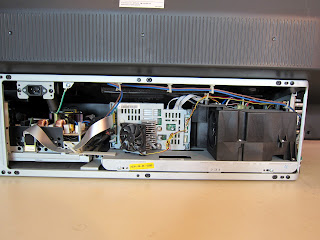
Rear Cover Removed


Although the ShopJimmy video says you'll need to remove/slide out the light engine assembly, that is not necessary for this model.  I did, and it was a pain keeping dust off all the mirrors.  You really don't want to do it.

What you need to do is remove the fan.  This can be accomplished by using a short screw driver.  Remember, take pictures and make notes.  You are going to be removing 20 or so screws and unplugging a few cables, so you want to be sure to remember what goes where.

Here is a photo of the fan removed:
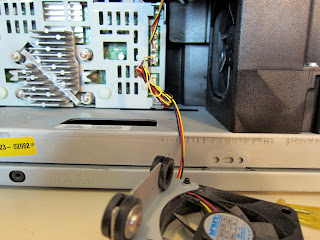
Heatsink Fan removed


You can see the two screw holes for the fan in front of the heatsink.  Note the orientation of the power connections for the fans.  Note also that these cables need to be removed before the DMD board cover can be removed.


Fan Connectors Unplugged


Now, use your needle-nose pliers and carefully remove the metal strap holding the heatsink in place.  Yes, that is all that is holding the heatsink.
Remove from the top left.

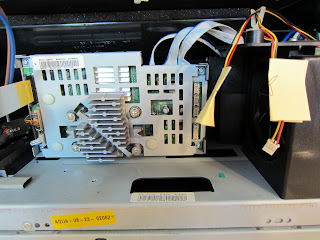
Now you can also remove the four screws holding the DMD Board cover in place.  Remove the board cover by pulling straight back. 
Heatsink/Board Cover Removed


Now carefully disconnect the remaining five cables.  The ribbon cable on the top left you pinch from the top and bottom and pull straight back.  The remaining cables have a latch you need to push in on the side from the bottom the carefully pull either up or straight back.

Now remove the DMD circuit board.

Remove the three screws firmly holding the board in position.  There are two on the left, and one on the right.  Then remove the four positioning screws (the ones with the springs).  Now you can remove the circuit board.  Carefully pull straight back.

You'll now see the DMD chip on the back of the board.  Remove the DMD chip cover.  Do this by removing the four remaining screws.  You could have alternatively done this before removing the DMD board from the housing.

Carefully pull the chip straight back from the board.  You can also carefully push from the otherside.  I did both.  Go slowly, you don't want to bend the pins.
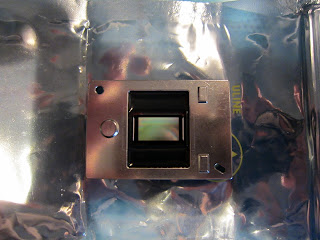
DMD Chip Front


DMD Chip Back


Now reverse the procedure to put everything back in place.  Note the chip has a notch, so it can only be installed one way.  Be extremely careful not to bend the pins.  On my set there was nothing locking the chip to the board other than the screws and the chip cover.

Now, what I would recommend is you test the positioning of the display before completely putting everything back together.  Don't put the DMD Board Cover back on, nor the heatsink.  

Heatsink/Board Cover Removed


Now you're going to test the display.  Make sure all the cables are reconnected, including the three fan cables.  This also means the heatsink fan also needs to be connected to power, but not connected to the set chassis.  If it isn't connected you'll get a nasty message when you power-on the TV.  Remember the three screws which were firmly holding the board in position?  Put them in loosely.  Have the four screws with springs connected relatively loosely, but not too loose, they are holding the board in place just enough so you can move it.  The four screws which are holding the DMD Chip Cover to the back of the board of course are tightened.

What you will notice is the board has a little bit of play in it.  We're talking millimetres of play - but on the display, this translates into inches.  When I first powered my set on, I noticed a five inch band of black on the top of the screen.  Have someone turn on the TV, use the remote and go to the Menu.  This will give you a reference point.  Slowly, carefully tap on the board to move it in the same direction of the issue.  If the display is too low, tap it down, the picture will move up.  If the screen is slanting upward to the right, tap the board so it moves upward to the right.  Again, we're talking very slight corrections here.  Once you are satisfied with the position of the display, turn off and unplug the TV.  Tighten the three position screws to lock the board in position.  Be careful not to move the board.

Now continue reconnecting everything.

The procedure sounds a little intimidating, but actually isn't that bad.  Just take your time.